Maida Seedai / Easy No Burst Seedai Recipe

maida seedai recipe


During evening time, I love to munch seedai especially the store-bought seedai from Ananda Bhavan and Grand Snacks. Few months back, I tried traditional uppu seedai recipe, it was a big flop. So thought of making easy maida seedai  with step by step pics for upcoming gokulashtami (Krishna jayanthi) and I got recipe from here. This maida seedai is very easy to make recipe, also delicious in taste.

If you are scared to make seedai like me, then do try this no burst seedai using maida. Even beginner can try this maida seedai for krishna jayanthi or diwali.


Preparation Time : 20 mins    Cooking Time : 30 mins    Serves :4

Ingredients For Maida Seedai

  • 2 Cups of Maida (All purpose Flour)
  • 1 Tbsp of Butter
  • 1 Tbsp of Sesame Seeds
  • 1 Tsp of Cumin (jeera)
  • 1/4 Tsp of Asafoetida
  • 2 Tbsp of Grated Coconut
  • 1 Tsp of Coconut Oil
  • Salt and water as needed
  • Oil to deep Fry

Method

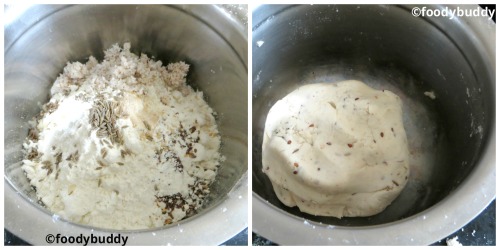
  • In a clean white cloth, add maida flour and make a bag, steam it by keeping over the idli plate for 15 mins. Once it done, let it cool down, then crumble it with your hands. Grind it in mixie to nice powder , this step is followed to avoid lumps.

easy seedai

  • In a mixing bowl, add flour and other ingredients except oil. Use water and form a smooth dough and non sticky.

no burst seedai

  • Roll it into balls out of the dough. Repeat the procedure till the entire dough gets completely over.
  • Meanwhile, heat oil in a pan, drop the balls slowly, fry this in medium flame for 10 mins till it turns golden colour. Warning : Be at a safe distance while frying. Drain then in a paper towel. Continue the deep-frying for the rest of the seedai.

seedai recipe

  • Let it cool down and store it in an airtight container.

Tips

  • Always cook seedai in medium flame.
  • Coconut oil adds a nice flavour to this seedai.
  • For proper cooking, make smaller balls than bigger one, because it won’t cook on inside.
  • After you take out seedai from oil, it wil be soft, once cooled down, it becomes crispy.
  • Cool completely before storing.

seedai with all purpose flour


Tags : ,,,,,,,,,,,,,


Aloe Vera Juice Recipe / How To Make Aloe Vera Juice

Aloe Vera Juice Recipe

Aloe vera juice recipe is easy and simple to make juice at home. This healthy aloe vera juice has tons of health benefits like it helps to detoxify your body, improves blood circulation and digestion and regulates blood sugar levels and helps to loss weight by accelerating metabolism. Adding aloe vera juice to your daily diet make your body fresh, energetic and rejuvenate the body. Since it is loaded with nutrients and goodness, it is called magical plant. This juice is a blend of all tastes like spicy taste from ginger, sweet taste from jaggery, sour taste from lemon and little salt, this will knock out the unpleasant aloe flavour (bitter taste) in juice. As jaggery is a better substitute for sugar, this juice is good for diabetic people too.  So here is the juice recipe for weight loss, do make your own aloe vera juice recipe at home and enjoy its all health benefits.

Ingredients

  • 1 Medium Size Aloe Vera Leaf
  • 1 Tsp of Grated Ginger
  • 1/2 Lemon juice
  • 2 Tsp of Jaggery
  • Little Pinch of Salt

Method

  • Cut one of the leaf closer to the ground.
  • Wash one or two times in running tap water. Cut them into pieces.
  • Take a knife, carefully remove the thorny edges and the outer peel from both the sides of leaf and separate the gel, wash again in cold water.
  • In a blender (mixie), place grated ginger, jaggery, lemon juice. Grind it and filter it to a bowl.
  • In the same blender, add aloe vera gel, blend it and filter it in the same bowl. Add little pinch of salt. Mix well with a spoon.
  • Your delicious glass of aloe vera juice is ready to enjoy.

Tips

  • Drink this juice in the morning.or evening.
  • You can use sugar or honey or agave in place of jaggery.

homemade aloe vera juice


Phulka Recipe / How to make soft Phulka on Stovetop (With Video)

soft phulka recipe    I learnt to make soft phulka on stovetop from my sister in law..she makes soft and best phulka. Everyone in my family are a great fan to her phulka. Initially I struggled to make phulka, after few trials, now I am confidently make phulkas in my own. Coming to the Phulka Recipe, it is an Indian flat bread made from wheat flour, oil, water and salt. Phulka is an hindi word which means to puff. The roti get puffed up when you expose it to direct flame. The main secret behind soft phulka lies on the mixing of the dough and rolling. Here, I added a tsp of flax-seed powder to make phulka more healthier and tasty. If you are in US, you cannot make phulka in electrical coil, in that case, use mesh directly to the coil and make soft phulka. Good accompaniment to soft phulka recipe are dal, aloo gobi, aloo mutter and aloo palak. So try to make soft and puffing phulka on stove top (gas top) and enjoy it for lunch or dinner.

 Preparation Time : 30 Mins   Cooking Time :30 mins   Serves : 15 Phulkas

Ingredients for Phulka Recipe

  • 1.5 Cups of Whole Wheat Flour
  • 2 Tsp of Oil and more for coating the dough
  • 3/4 Cup of Warm Water
  • 1 Tsp of Flax Seed Powder
  • Salt as needed
  • Ghee as required (To smear on top)
  • Wheat flour for dusting.

Method

  • In a mixing bowl, add whole wheat flour (I used ashirvaad atta), salt, flaxseed powder, oil and add water little by little, knead well and form a smooth dough. Add few drops of oil to coat the dough, leave it for 15-20 mins. This relaxes gluten and make the dough soft and easier to roll out.
  • Keep the flour for dusting and knead the dough again and make balls out of the dough.
  • Preheat the tawa in low flame and keep the ghee bowl ready.
  • Using rolling-pin, make them into round rotis, dusting in the flour when needed.
  • In the meantime, turn the stove to medium high flame, lay the roti on it. After few seconds, roti changes colour and bubbles appeared, flip it to other side. Cook it for seconds and place the roti on direct flame using tongs. Roti puffed up like balloon. Remove roti using tongs and place it on a plate and immediately apply ghee on one side. Transfer it to casserole (Hot pack)
  • Repeat the same process for rest of the dough.
  • Serve hot with your choice of curry, dal or gravy. Hope this video helps beginners who want to try soft phulka.

Tips

  • Warm water helps to make dough soft.
  • Always use minimal flour to dust. Otherwise it makes the roti hard.
  • Always roll the rotis thin and evenly
  • When you transfer the rotis to direct flame, make sure the flame is high and the side does not turn golden brown should face down under direct flame.
  • Some people do add milk or curd while kneading the dough, to make soft phulka.

how to make soft phulka at home